Professional Photography: Master EXIF Analysis with ExifReader
Every professional photographer has a "secret sauce" that makes their images stand out. Have you ever looked at a breathtaking landscape or a sharp portrait and wondered, "What were the exact settings used to capture this?" Understanding the technical DNA of a photo is the fastest way to improve your own craft.
In photography, every image carries hidden details about how it was captured. This digital fingerprint is what we call EXIF data. It stands for Exchangeable Image File Format. It is a hidden record of every decision your camera made the moment you pressed the shutter. By learning how to perform a professional photography EXIF analysis, you can reverse-engineer great shots and learn from your own mistakes.
To start your journey into image forensics, you can check EXIF data using our secure online tool. This guide will show you how to turn those raw numbers into actionable photography skills.

Understanding EXIF Data for Professional Photography
EXIF data is more than just a list of numbers; it is a digital diary of a photographic event. For a professional, this metadata serves as a vital educational resource. When you look at a file, you aren't just seeing an image; you are seeing a record of light, timing, and optics.
In the past, photographers carried notebooks to record their settings. Today, your camera does this automatically. However, this data is only valuable if you know how to interpret it. Once you understand this data, you'll start noticing patterns in your photography that were invisible while you were actually taking the shots.
Key EXIF Tags Every Professional Should Know
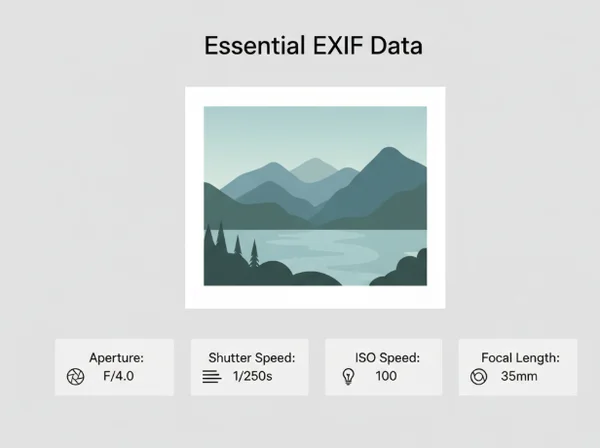
To get the most out of your analysis, you must focus on the tags that impact image quality the most. While there are hundreds of metadata fields, a few are critical for professional growth.
-
Aperture (F-Stop): This tells you about the depth of field. If a portrait has a beautifully blurred background, the EXIF data will show you the exact F-stop used to achieve that look.
-
Shutter Speed: This is crucial for understanding motion. Did the photographer use a tripod for that silky waterfall? A shutter speed of 2 seconds or more will confirm it.
-
ISO Speed: This reveals how the camera handled light sensitivity. Analyzing ISO helps you understand the balance between digital noise and image clarity in low-light situations.
-
Focal Length: This tag shows the "zoom" level. It helps you understand how different lenses compress space or widen the field of view.
-
Metering Mode: This indicates how the camera evaluated the light in the scene. Understanding whether "Spot" or "Matrix" metering was used can explain why an image is perfectly exposed.
The Limitations and Pitfalls of EXIF Data
While metadata is incredibly helpful, it is not always perfect. As a professional, you must be aware of the "blind spots" in technical records. For example, if you use an old manual lens with an adapter, the camera might not record the aperture or lens model correctly.
Another pitfall is "stripped" metadata. Many social media platforms like Facebook and Instagram remove EXIF data to protect user privacy and reduce file size. If you download an image from the web and find no data, this is likely the reason. Additionally, some post-processing software can overwrite original camera timestamps or GPS locations. Always try to analyze original RAW or high-quality JPEG files to get the most accurate results.
Analyzing Shooting Conditions Through Metadata
Metadata's true power is how it lets you recreate a scene. It helps you understand how photographers solved lighting challenges or captured difficult subjects. This gives you insights into their creative process. Professional photography is often about problem-solving. By looking at the data, you can see how another photographer solved the problem of harsh sunlight or deep shadows.
When you view image metadata, you are looking at a snapshot of the environment. You can see the date and time, which tells you the position of the sun. You can see the white balance, which tells you about the color temperature of the light.
Decoding Lighting Information from EXIF Data
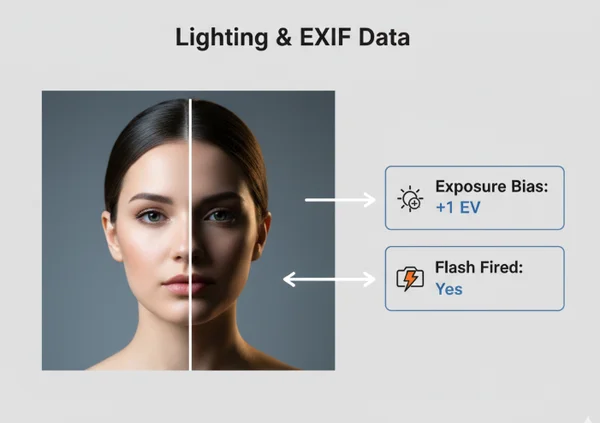
Light is the most important element of any photo. EXIF data provides several clues about how light was managed. The Exposure Bias tag is particularly useful. It shows if the photographer intentionally overexposed or underexposed the image to compensate for tricky lighting.
Flash settings are another goldmine of information. The metadata will tell you if a flash was fired and, in some cases, the power level of that flash. By studying these tags, you can learn how professionals mix artificial light with natural ambient light. You can see if they used "Slow Sync" flash to capture background detail while freezing a moving subject.
Lens Performance Analysis Through Technical Metadata
Every lens has a "sweet spot"—an aperture setting where it is sharpest. Through advanced camera metadata techniques, you can find this spot for your own gear. By comparing images taken at different F-stops, you can see where diffraction begins to soften your edges.
Technical metadata also reveals how a lens handles distortions. Professional-grade software often uses the "Lens Model" tag to apply automatic corrections for vignetting or chromatic aberration. If you notice a specific lens always looks "soft" in the corners, checking the EXIF data can help you decide if you need to stop down the aperture or upgrade your equipment.
Advanced EXIF Workflow for Professional Results
To truly master your craft, you need a systematic professional photographer EXIF workflow. It is not enough to look at the data once in a while. You should integrate metadata review into your regular post-capture routine. This habit helps you bridge the gap between "getting lucky" with a shot and being able to produce high-quality results consistently.
Modern photographers use metadata to organize their libraries and track progress over years. This self-auditing process helps prevent repeating technical errors. It bridges the gap between 'getting lucky' with a shot and consistently producing high-quality results.
Comparative Analysis: Before and After Using EXIF Insights
One of the best ways to learn is through comparative analysis. Take two similar photos—one that you love and one that feels "off." Use our online exif reader to place their data side-by-side.
Perhaps the sharper image used a faster shutter speed than you realized. Maybe the color in one looks better because the "Color Space" was set to AdobeRGB instead of sRGB. This "before and after" approach removes the guesswork. Instead of wondering why a photo failed, you have a clear technical explanation. This clarity allows you to adjust your settings on your next shoot with total confidence.
Integrating EXIF Analysis Into Your Post-Processing Workflow
Post-processing is where metadata becomes a functional tool. When you import photos into software like Lightroom or Capture One, EXIF data guides how the software processes the file. The 'White Balance' tag provides a starting point for color correction. EXIF data can also influence automatic lens corrections.
A professional workflow also involves checking for privacy and security. Before delivering files to a client or posting them online, you should check if the GPS location is included. If you are shooting a private event or a sensitive location, you may want to ensure that location data is not being shared. By using a tool to read exif data before final delivery, you maintain professional control over your digital footprint.
Your Next Steps in Mastering Technical Photography
Getting better at photography with EXIF data is an ongoing journey that will transform how you approach every shot. By treating every photo as a data set, you move beyond the "auto" mode of thinking. You begin to understand the physics of light and the mechanics of your camera on a deeper level.
Remember these three key takeaways:
- Analyze the "Why": Don't just look at the shutter speed; ask why that specific speed was chosen for that specific subject.
- Audit Your Gear: Use metadata to find the strengths and weaknesses of your lenses and camera sensors.
- Protect Your Privacy: Always be aware of the location and device information hidden in your files.
The best way to start is by looking at your own work. Go to ExifReader.org and upload your best photo from last month. Study the settings, remember the day you took it, and see if the data matches your memory. With every image you analyze, you become a more precise, more informed, and more professional photographer.
Frequently Asked Questions About Professional EXIF Analysis
How accurate are EXIF data readings from professional cameras?
EXIF data from modern professional cameras (like Nikon, Canon, Sony, or Fujifilm) is extremely accurate. The camera’s internal computer records technical settings the millisecond the photo is taken. However, ensure your camera's internal clock is set correctly, as the "Date and Time" tag relies on your manual settings. If you want to verify your camera's output, you can see your results instantly on our platform.
Can EXIF data alone determine the quality of a photograph?
No, EXIF data only explains the technical execution. It cannot measure artistic elements like composition, emotion, or the "decisive moment." A photo can have technically perfect EXIF settings and still be boring. Conversely, a blurry photo might be a masterpiece of emotion. Use metadata to support your art, not to replace your creative vision.
What EXIF information is most critical for landscape photographers?
For landscape photography, the most critical tags are Aperture (to ensure maximum depth of field), ISO (to keep it at the base level, usually 100, for maximum dynamic range), and GPS coordinates. GPS data is especially helpful for professionals who need to return to the exact same spot for different seasons or lighting conditions.
How can I compare EXIF data between multiple images efficiently?
The most efficient way is to use a dedicated viewer that doesn't require bulky software installations. You can try our free tool to quickly toggle through images. Simply drag and drop your files one by one to see how your settings changed across a single session. This is much faster than opening every file in a heavy photo editor just to see the technical specs.